9.30.2009

Oriole's & Raven's Diaper Cake

This past weekend my cousin and his wife were surprised by their families with a baby shower. Baby Brody is due November 10th!! Unfortunately, I wasn't able to attend the shower because of Missy's wedding [If you're reading this CONGRATS Mrs. Mattern!!!]. To make up for my absence I sent a Diaper Cake to the shower for the parents-to-be.

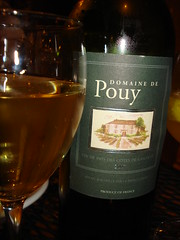
This is my first Diaper Cake but I'm really happy with the way it turned out. My cousin and his wife decided on a sports theme for the nursery and my cousin is a Baltimore sports fan so I thought it would only be appropriate to do a sports themed Diaper Cake. From what I hear, you typically use a bottle of bath soap or lotion in the center but I opted to use a bottle of the mother-to-be's favorite wine. I think it'll be a nice surprise for her!!


I hand-made the footballs and Oriole Birds.


I also painted the wooden B to match the cake.


And since I put so much work into the Diaper Cake I had to include a hand-made card.

If you know me and you know anyone expecting... I'd love to make a Diaper Cake for you.

Enjoy, Amanda

9.28.2009

Placemat Clutch

As promised, I wanted to show you the Placemat Clutch I made using Jessica's tutorial as a jump-off point.

After coming across her tutorial on Wednesday, I had to try it out. I had some errands to run so I added Burlington onto the list. They had a pretty wide selection of placemats to chose from all under $3. I also stopped at Joanne Fabric and searched their jewelry section for something I could turn into a pin to accent the placemat. I found just what I was looking for!!

This had to be one of the easiest projects I've ever completed. All that needed to be done to create the purse was sewing two seams along the existing seams of the placemat, adding a magnetic closure, and attaching the pin.

Enjoy, Amanda

9.23.2009

Zucchini Bread

Sunday I woke up in the mood to get things done!! After being on vacation all week there were a lot of things around the apartment that had been neglected... most importantly our fridge! So I decided to be the good housegf that I am and went grocery shopping. On the way there I stopped off at the a local produce market and saw that they had zucchini... the craving I'd been having for zucchini bread suddenly reappeared with vengeance. I bought 3 and as soon as I got home started baking.

Ingredients:
3 Eggs
1 cup Vegetable Oil
2 cups Sugar
2 cups Zucchini, grated and well drained [about 1-1 1/2 Zucchinis]
1 teaspoon Vanilla
3 cups Flour
1/2 teaspoon Salt
1/4 teaspoon Baking Powder
1 teaspoon Baking Soda
3/4 teaspoon Nutmeg
1 tablespoon Cinnamon
1/2 cup Raisins [optional, I didn't use them]

Directions:
1. Mix together eggs, oil, sugar, zucchini, and vanilla. Set aside.

2.Mix together flour, baking power, baking soda, salt, nutmeg, and cinnamon. Add to first mixture. Add raisins if desired.

3. Pour into 2 greased and floured loaf pans. Bake at 350 degrees for approximately 45-50 minutes or until the center springs back when touched.

Enjoy, Amanda

Oh and I have to mention that I managed to try Jessica's placemat clutch tutorial last night!! Pictures tomorrow!!

I've been doing a little blog stalking...

and I came across one of the cutest and might I add cheapest ideas ever!!!

Jessica over at Happy Together has some of the best ideas and tons of tutorials to share. I suggest giving her a blog a read through. But there's one in particular that has me wanting to run out to Target to buy some placemats pronto...

[Picture Courtesy of Happy Together]

Head on over to her blog and check out this tutorial. If I didn't already have a huge to do list as it is this week I'd start on one tonight. On second thought I do need a clutch for Missy's wedding...

Enjoy, Amanda

9.21.2009

Home Sweet Home


And it's back to reality... Vacation was amazing!! The weather was pretty perfect the entire week. We did lots and lots of relaxing and laying out on the beach. We managed to go see everything we wanted to. We took approximately 500 pictures! I loved using my new camera and I'm starting to get used to the settings.

It's bittersweet being back home. While I miss Myrtle Beach and the lazy atmosphere, I'm excited to be back in Baltimore and enjoy the beginning of Fall. Luckily, I came home to beautiful weather. It makes me want to throw on a sweater and a pair of flats! [Sidenote: I'm planning on doing some serious purging of my fall/winter wardrobe and buying of lots of new cute clothes!]

I have a lot of projects upcoming... especially for this week. It seems my To-Do List is continuing to grow. But lucky for you that just means more fun projects to post about!!

This Week...

  • attempt to make my first Diaper Cake... by Sat
  • make Linda [my mom] a Thank You gift for watching Remy while we were away... by Thurs
  • make Mrs. Marsha [a friend in my bowling league] a birthday present... by Thurs
  • finish my Myrtle Beach book [need tons of pics printed out]... by ASAP
  • find an outfit for Missy's [good friend from high school] wedding [which may not seem like a project but it'll take about as much time!]... by Sat

Enjoy, Amanda

9.11.2009

Myrtle Beach... Here we come!!!

I couldn't be more excited that Jeremy and I leave bright and early tomorrow morning for Myrtle Beach!! This vacation is much needed!

Seeing as how my scrapbook for last year's trip to Myrtle Beach is still not finished I opted to do things a little different this year. Inspired by Elise Blaha's workshop I'm taking I decide to make a mini-album to take with me. I was kind of rushed in putting it together but I think by the end after adding pictures and memorabilia from the trip it'll be exactly what I hoped for.

The focus of the workshop I'm taking is more on art journals than it is mini albums but I'm a scrapbooker at heart and just can't seem to break the habit of incorporating layouts with the pages. Although I have learned a lot in the workshop and when I return home I'd like to make an attempt at creating an art journal... as silly as it sounds I'm scared and slightly intimidated about the idea of making one.

Here are some pictures of the "shell" of the book for Myrtle Beach. Sorry for the dark pictures I didn't have very good lighting, obviously. I still need a front and back cover. I'm hoping to be inspired by something while we're away!

When I get back and have it all finished I'll be sure to post the completed book.

I can't promise I'll be posting anything while I'm away but I'd like to!! I know I'm going to be spending the 7 hour ride trying to figure out how to use all of the functions on my new camera!

Enjoy, Amanda


9.10.2009


Ingredients:
2 tsp. oil
1 lb. boneless skinless chicken breasts, cut into strips 3 cups frozen stir-fry vegetables, thawed
1/4 cup KRAFT GOOD SEASONS Asian Sesame with Ginger Dressing
2 Tbsp. soy sauce
1 Tbsp. honey
1/4 cup chopped PLANTERS COCKTAIL Peanuts
4 cups hot cooked instant white rice


Make It!

HEAT
oil in large skillet on medium-high heat. Add chicken; cook and stir 7 min. or until no longer pink.

ADD
vegetables, dressing, soy sauce and honey; mix well. Cook an additional 2 min. or until heated through. Sprinkle with peanuts.

SERVE
over the rice.


It's a super easy dinner! I'd recommend marinating the chicken in the dressing for an hour or so before you make it. Oh and make sure you don't overcook your veggies- they'll get mushy!


Enjoy, Amanda

9.09.2009

Passport Wallet

This is my first attempt at creating a tutorial so please bear with me! Please feel free to ask any questions if I didn't make a step clear. With that being said I made this passport wallet for my friend Juls, who is moving to Spain in less than a week!!!


Materials & Measurements:

Outside Fabric (purchased from Ikea)

  • Shell- 8"X12"
  • Right Flap- 8"X3"
  • Left Flap- 8"X5"
  • Pocket- 4.5"X3"

Inside Fabric (purchased from Jo-Ann Fabrics)

  • Lining- 8"X6.5" and 8"X6"
  • Passport Pocket- 4.5"X5"
7" Zipper
4" Skinny Elastic
Button


*Side note- For this project I used a thicker/sturdier fabric for the outside fabric and a simple cotton for the lining. The studier fabric on the outside helped the wallet keep its form. You could always use interfacing if you wanted it stiffer.

**Beware- This post has A LOT of pictures!! Just thought it'd be easier to understand that way.

Directions:

  1. Press all pieces of fabric. I know this seems unnecessary but believe me it really helps with measurements when there aren't crinkles in the fabric.

  2. Cut all pieces out on paper and trace onto fabric. Cut out fabric.


  3. Attach the zipper to the two pieces of lining material along their 8" sides.
  4. Press ¼- ½" seams on all edges of the passport pocket and smaller pocket. Sew seams on both of the pockets. Press seam on the right edge of the left pocket and sew. Press seam on the left edge of the right pocket and sew. Pressing in this step makes clean edges for when you sew pockets and flaps down.
  5. Sew the small pocket on the passport pocket.

  6. Sew the passport pocket onto the left flap. Keep to the far right of the pocket because you'll need a seam allowance on the left side of the left flap.
  7. Lay right flap on top of the lining to the right side of the lining. Sew credit card pockets into the right flap (be sure the measure your cards will fit before sewing). To sew the pockets simply sew from the right edge or fabrics to the left edge of the right flap.
  8. Sew button to the right side of the shell fabric where you think it should go.
  9. Lay the left flap to the left of the zipper. Sandwich fabric with right sides together. Remember to open the zipper a few inches so you're able to flip the wallet right side out. Trace straight lines around the perimeter of the fabric to sew along (Don't have to the previous sentences but it helps the keep the lines looking neat.)Take elastic and slide loop into the sandwich of fabric and pin in place. Sew around the perimeter line.
  10. Trim excess fabric.
  11. Turn right side out.
  12. Press.
  13. Determine where the center fold is and sew a straight line from top to bottom.
  14. Fill it with your passport, money, ID, and credit cards!!!

There are plenty of variation you can do to this. If you don't want it to be for a passport you can always do away with the pockets on the right and make more credit card slots.

I hope this was helpful. I'd love any feedback!!

Enjoy, Amanda

9.08.2009

Maryland State Fair and a holiday weekend

This was an incredibly lazy holiday weekend, which is exactly what I needed to start this week off with. There is tons to do this week in order to get everything in order for vacation Saturday. Even though it was a lazy weekend I didn't do one bit of crafting... I thought about it and every time I opted for an unwatched show on the DVR or reading "Eclipse" (which I'm almost done). But don't worry I'm planning on having a tutorial up one day this week for a passport wallet... I just hope my directions make sense!

We did make it to the Maryland State Fair this weekend. Neither of us had been in the past few years so we figured we'd make a day of it. To be honest I just like the farm animals and the food!! I'm not a huge fan of fair rides or games. We definitely filled our bellies with fattening fair food. Nothing better than cheese fries with old bay and a peach dumpling sundae!!

We saw tons of tons of farm animals. I even got to pet a baby pig!! Oh and I can't forget about the pig racing!! HILARIOUS seeing 4 little piglets running around a race track for an Oreo. Only at a state fair!

I also really enjoy looking at all the winning produce and flowers and arts and crafts. The colors of all the different foods are really a good inspiration. I'm really liking the bright color of the peppers and the earth tones of the corn.


I'm really interested in what it takes to enter your crafts/pictures into the fair... I'm going to have to do some research.

And because I'm super excited 4 days until we leave for vacation... tonight I must conquer laundry and begin on my mini album for our trip!!

Enjoy, Amanda

Oh I almost forgot the most exciting about the weekend... I purchased a new camera!!!! My only worry is that it won't be here in time for vacation... but it's okay if it's not I'm still just as excited to have a new toy. Hopefully my photos with improve!!!

9.03.2009


I had a fantastic time at dinner last night. Like I said yesterday we went to Mezze to celebrate Juls moving to Spain. We had delicious drinks and food! Not to mention great conversations. I'm so happy for Juls but I'm definitely going to miss her while she's gone!!

We started off with a craft of white sangria. DELICIOUS!!! I've never had white sangria before but after trying it I definitely prefer it over red.

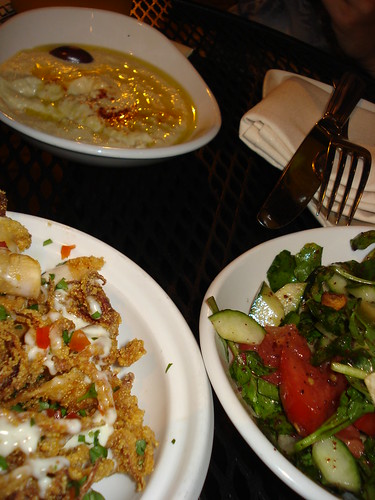
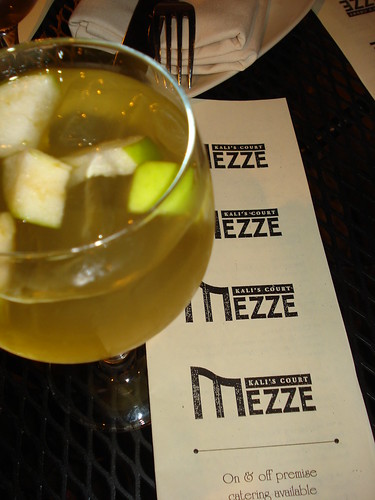
We started off with fattoush, calamari, and hummus. All were really tasty. We also ordered goat cheese stuffed peppers, shark fritters, and roasted salmon.

And we finished dinner with a bottle (or 2) of wine! It was great seeing the expression on Juls' face when she opened her going away presents!! I'm so glad she liked everything we made/bought her.

I highly recommend Mezze to anyone who is in the Fells Point area of Baltimore.

[I had to include a pic of us since we're all dressed up pretty! Juls, Grace, Me]
Enjoy, Amanda