10.22.2009

Halloween Hershey Kisses

A friend of mine passed along wonderful news.... Hershey's has come out with not only Candy Corn Kisses but also Pumpkin Spice Kisses!!! You should be able to find them at Target.


Has anyone tried these yet??


Enjoy, Amanda

10.20.2009

Owl Embroidery

Of course it's beautiful and sunny out today!! We did not get lucky this weekend as far as weather is concerned. Our entire weekend camping was spent under a tarp, freezing!! Fortunately, we were able to make the most of it [unfortunately, I don't have a single picture to show for it due to the constant down pour].

Knowing it was going to be cold this past weekend, I thought it would be nice to have an extra layer to wrap around me while sitting by the fire. I didn't have much time to throw something together so I decided to buy a blanket from the store and embroider it with a fun looking owl. A girl can't just use a plain green blanket!! I had to make it unique somehow!!

Seeing how it was so simple I thought I'd share how I made it with you. Sorry ahead of time... I did most of this while at my bowling league so I don't have many pictures to show!


To start...

1. Buy a blanket and find an image you'd like to use. I just googled a couple key words... originally I wanted to do a tent of a fire but couldn't find anything that I really loved so I scratched that and searched "owl embroidery image." Once I found it I printed it out. Gather the other supplies you'll need: embroider floss in various colors, an embroidery ring [I think that's what it's called], and an embroidery needle.

2. [The next two steps could have probably been done in a much better way... so if you know of a better method please share!! Like I said I was on a time crunch!!] Iron medium weight interfacing [stabilizer] to the back of the blanket on the area where you plan to embroider your image.

3. Put your blanket into the embroidery ring and trace your image onto the blanket. To do this I place the paper print out onto the blanket and traced over it with a pen until the pen broke through to the paper. [Like I said there has to be a better way to do this!!]

4. Decide what colors you're going to use for which areas of the image along with which stitches you'll use. I decided to outline the owl in brown using the back stitch and filled in the eyes and wings using the satin stitch.

5. Now get to work!!!

If anyone has done their own embroidery, leave me a comment. I'd love to see your work!!

Enjoy, Amanda

10.15.2009

Shrimp Skewers

In honor of camping I'm sharing my favorite camping dinner with you!! It's both delicious and super easy to make because you do most of the work before you leave the house!

Ingredients:
Shrimp
Bacon
Veggies- I use onions and peppers
Grape Tomatoes
Teriyaki Marinade
Wooden Skewers


Directions:
1. Cut up veggies into good size pieces to be poked through with a skewer.


2. Put veggies, grape tomatoes, shrimp, and marinade into a plastic bag. Give it a good shake and throw it into the fridge/cooler until you arrive at the campground.


3. When you're ready to cook dinner, start with precooking the bacon in a frying pan over the fire. Also, soak skewers in a pan of water [you don't want them catching on fire!!].

4. When bacon is halfway cooked remove from fire and begin to wrap shrimp with bacon.

5. Stick veggies, tomatoes, and bacon wrapped shrimp with the skewers and place on the fire.

6. Cook until shrimp is pink, bacon is done, and veggies are the texture you like.

7. Enjoy eating your dinner!!!


Enjoy, Amanda

10.14.2009

Camping Checklist

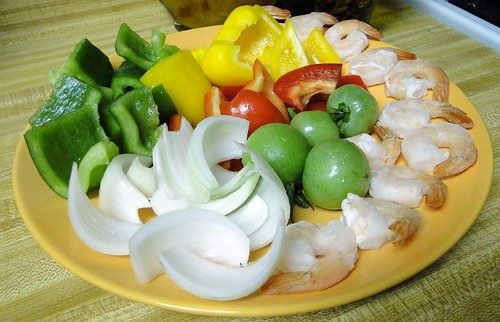
I'm a bit of a self confessed control freak with OCD tendencies. I make lists for any and everything. It's a habit I don't ever see breaking. It gets even more obsessive when I'm planning trips!! Camping is no exception.

I've just made it easier on myself though! I've created a masterlist of everything I need for a camping trip. I've laminated the piece of paper so I'm able to write on it with dry/erase markers. I keep this list attached to the lid of my super-duper tupperware container!! This container holds EVERYTHING [well almost everything] needed for a camping trip!! It's great to have everything in one place, both convenient and easy to restock.

I'm sharing my list with you to download and printout. It's a big help keeping yourself organized!!

Click here to download Camping Checklist

Enjoy, Amanda

10.13.2009

Camping Roundup

I decided to do a search of the Internet to see what it had to offer as far as crafting and camping go! Below are some of my favorite photos and some great How-To links and some awesome Etsy finds!!


Although I tent camp I kind of love all of the following campers... maybe I can talk Jeremy into one of these cuties instead of a house??


[Courtesy of Flickr user jenniferrt66]

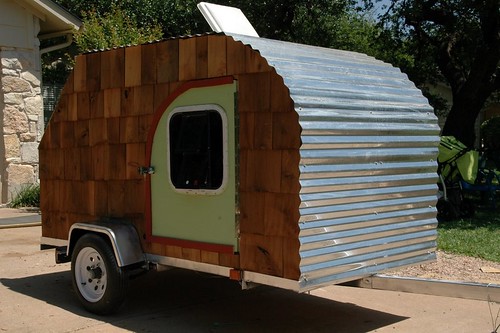
[Courtesy of Flickr user mtseay]


[Courtesy of somewhereelse.com/au]


[Courtesy of apartmenttherapy.com]

Here are some basic How-To's related to all that is camping!!

Decorative Camping Paper and Writing Set

Camping Bag... I can't wait to make this!

Firestarters

Canvas Camping Chair

Peanutbutter Jar Lantern... I think I might try this one too.. I have all of the supplies at home.

I found all of these on Etsy and love each and every one of them!!

Campfire S'More's Bracelet

Eco Friendly Flatware

Camp Out Paper Bag Album

The Silver Bullet Necklace

Outdoorsman Thermal T

Enjoy, Amanda

10.12.2009

Skyline Drive and Camping

What an amazingly beautiful weekend!!! Jeremy and I decided to take off on Saturday morning for Skyline Drive in Virginia. It was such a good idea.

The scenery was so beautiful. It is definitely fall around here. All of the leaves were shades of red, yellow, and orange. The only downside of the entire trip was when we arrived and I went to take my first picture and the battery icon was blinking and said there were only 20mins left on the battery!! Lucky for me I had my old camera so I made it through the weekend able to take lots of pretty pictures!
We entered Skyline Drive through the northernmost entrance at Front Royal, VA. We didn't travel all 105 miles but we made it about halfway. Jeremy and I stopped off at many of the overlooks along the way [we even took a nap at one on Sunday].


Instead staying at a hotel in a town along the route we opted to camp out for the night. What a better idea!! Camping has got to be one of my favorite things to do [besides craft]. We started off with a little trouble trying to find a campground that wasn't full but luckily we found Outlander's River Camp. It was a great campground that just opened on Labor Day. We were the first ones to ever use the fire pit on our site!! If you're ever in the Luray, Va area I highly recommend you stay a night at one of their riverside primitive campsites.


The view from our site was awesome... a corn field straight ahead and mountains all around!!

The Shenandoah River was a short hike from our site.
After a very CHILLY night we spent the following day exploring the town of Luray and attending the local Heritage Festival. It was right up my alley... tons and tons of homemade goodies!

Since it was so nice out we continued to sight see along Skyline Drive.

I really wanted to see a waterfall so we stopped off at Dark Hollow Falls and took a 1.4 mi hike down the mountain to the falls.

Unfortunately, when we arrived I was a bit disappointed. It was more of a trickling stream than a falls... not to mention the hike back up the mountain was a bit strenuous [maybe I should take that as a hint it's time to get back to the gym!!].


It was an absolutely perfect weekend. It couldn't have been better!!!

Now it's time to start getting ready for next weekend's camping trip to Greenbrier State Park. With that being said I think I'm going to keep this week's posts focused on camping!! There's nothing more fun to do in fall. So if you have any good camp recipes, campgrounds, or anything that you think is worth sharing please be sure to leave me a comment or email me!!

Enjoy, Amanda

10.09.2009

Cheesy Chili Salsa Dip.. or something like that

Last night at bowling we were celebrating yet again another birthday and I wanted to bring something new! This recipe was given to me from a friend [not too sure where they got it from]!

Ingredients:
One jar of salsa
One can of Hormel Chili [no beans]
Velveeta Cheese [1lbish]
Groundbeef [1lbish]
Bag of Tortilla chips


Directions:
1. Cook groundbeef, heat Hormel Chili, microwave Velveeta Cheese on 50% power stirring occasionally.

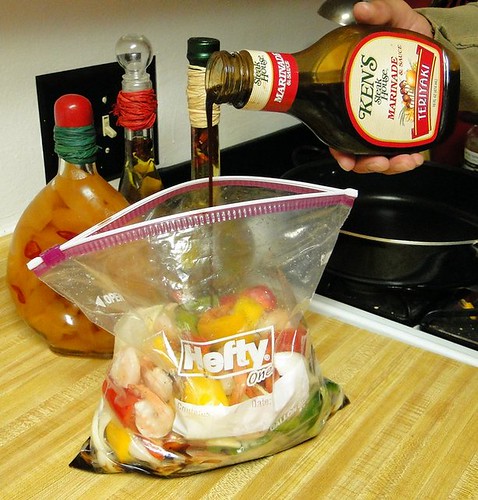
2. Combine all ingredients.

3. Serve and enjoy with Tortilla chips!!


Enjoy, Amanda

10.08.2009

Makeup Bag Tutorial

[I'm moving Food for Thought Thursday to Friday... I'm trying a new recipe this evening for bowling and want to share it with you tomorrow!!]
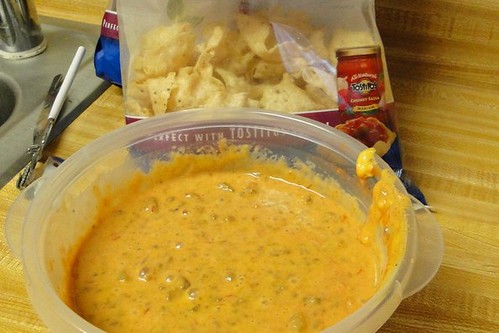
Yesterday, I was in a time crunch for a birthday present for this evening. I didn't have the time or the money to run out to the store so I turned to my stash of fabric and figured I could throw something together with some supplies I already had.

My original idea was to make a wristlet but realized I only had a 7inch zipper and that wouldn't be long enough for the size wristlet I wanted. Instead, I opted to make a small makeup bag- the perfect size to carry in your purse.

I used...
2 fat quarters (or scrap fabric) I had lying around in coordinating fabrics [make sure you press them before beginning]
1 zipper
interfacing

I made it by...
1. Cut your fabrics according to the size bag you want- 2 pieces from each fat quarter Also cut 2 pieces of interfacing. I had a wristlet lying around that I based my measurements off of.

2. Iron on interfacing to the 2 exterior pieces of fabric.

3. Okay this was the confusing part [at least for me]. You're going to sew your interior fabric to the zipper by lining up the underside of the zipper with the right side of the fabric facing it [hope that makes sense... I think I confused myself just typing it!!]. Then for the exterior fabric you're going to line up the topside of the zipper with the right side of the fabric facing it. Hopefully the picture helps...


4. Next open the zipper almost all of the way. Then take the two exterior pieces and pin them together with right sides together and do the same withe interior pieces. To make sure my bag is symmetrical I drew lines on the exterior fabric to follow while sewing.

5. Sew along lines on the exterior fabric. Do the same for the interior fabric but be sure to leave room in the in bottom to flip everything right side out.
6. Flip right side out. And stitch the whole closed.

7. Fill it with your favorite cosmetics and throw it in your purse and you're done!!!


Enjoy, Amanda

10.07.2009

What's been going on?

I know it's Wednesday and I'm blogging about my weekend... but it was a good weekend so I thought I'd share.

As I mentioned Jeremy was out of time so I figured I'd make the most of my time while boyfriendless.

Friday evening I spent the night surrounded by various craft projects [most of which are not yet completed]. It was nice to spread out in front of the TV with all of my supplies and get a lot of things started and a few finished. I also watched Twilight for the first time. I'll leave it at I enjoyed the book MUCH better than the movie. Here are some sneak peak photos of what I was working on [posts to come later].
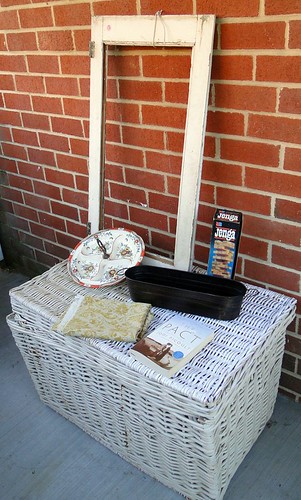
Saturday I woke up bright and early to meet my mom and niece Kylie for some yard and craft sale-ing. It was definitely a beautiful morning for yardsales. The Mayfield and Lauraville communities were both having sales that we checked out.
There's nothing better then a great find at a yard sale. I managed to get the few things below all for under $10!! I'm not sure what I'm going to do with everything yet but I guarantee there will be follow up posts when I figure it out!!

The Fells Point Festival was also this weekend so I for a few hours with Vicki. It was good time. We got to enjoy cornbread mozzarella "grilled cheese sandwiches" on the water!!

Saturday evening I attended a jewelry party hosted by Jeremy's mom. It was nice to see the women of his family [and for my mom to meet them!!]. I purchased a few pieces that I can't wait to get!!

Sunday was another beautiful day. My sister, Sara, and I went to an early lunch at Panera Bread, which was absolutely delicious. The Ravens had a 1pm game so Sara and I met up with Vicki, my mom, and a few of her friends! It was a lot of fun with all of us watching the game together!!
Overall, it was a great weekend spent with great friends and family. Leaves me looking forward to this weekend... Jeremy and I are planning a mini get-a-way to Sky Line Drive!!! Nature here we come!!

Enjoy, Amanda

10.06.2009

Awesome Giveaway

Ericka over at Oops, I Craft My Pants is celebrating her 200th follower with an awesome giveaway!! A pair of Modge Podged shoes!!! Head over to her blog and check them out!

[Picture courtesy of Oops, I Craft My Pants]

Don't worry I'll be back tomorrow. I had one busy weekend and have been feeling a little under the weather so far this week!

Enjoy, Amanda

10.02.2009

Boyfriendless...

I'm officially boyfriend-less for the weekend. Jeremy is enjoying a weekend out in the wilderness and I couldn't be more jealous [Hope you and Mike have a great weekend]!!! But it's okay because I have created a jam-packed weekend for myself full of relaxing, crafting, shopping, and tons of times for myself, family, and friends!

Tonight, it'll be a little me time with the sofa, some craft projects, popcorn, Twilight, and Remy. I couldn't be more excited!! Tomorrow, [Keep your fingers crossed for nice weather!!!] I'm doing some craft/yard sale shopping with Vicki and my mom and niece in the morning, spending the afternoon with Vicki at the Fells Point Festival, and for the evening I'll be attending a Jewelry Party at Jeremy's parent's house. Sunday, it's FOOTBALL FOOTBALL FOOTBALL!!!

It's been a slow day around the office so I've created a HUGE list of projects I want to complete in the near future [hopefully a few tonight!!] . I've been slacking with my posts so the completion of these projects will give me tons and I mean TONS to blog about!!

Hope everyone out there has a fantastic weekend enjoying the fall weather!!

Enjoy, Amanda